
Saturday 14 May 2011
Monday 9 May 2011
"We Come In Peace"
Target audience:
The target audience of this picture is aliens. Since it is impossible to know how they will interpret images, colours and themes its best if the image was designed to be produced for kids. It should be very simple and easy to understand. Also it should have bright colours and only one main image to keep the focus and not make it too confusing.
Message:
This image is meant to clearly describe that we come in peace and since we can’t be sure if the aliens can speak any language from earth there should be no text. The message should be conveyed through other ways, such as colour. Too much black or red should not be used as that could be misinterpreted and change the intended message. Preferred colours are blue, green, yellow and white.
Purpose:
The reason for this image is so if any aliens come into contact with it, they will easily understand that the human race shows no hostility towards them.
Outcome of Production:
The outcome is to be an image of a white flag blowing in the wind. On the flag is a large hand holding up two fingers (the peace sign) drawn in contour line. In the palm of the hand is the earth. A is ring around the earth and consists of every different race of humans (White, Black, Asian and so on). The people are a combination of male and female and are naked and holding hands.
Styles/Genre:


Styles/Genre:


Saturday 7 May 2011
Anti-Smoking Campaign (Kids)

Anti-Smoking Campaign (Teens)

Anti-Smoking Campaign (Adult)

I took the pictures of the people myself, but i got the image of the cigarette of the internet.
Tuesday 3 May 2011


Thursday 28 April 2011
Thursday 14 April 2011
A Line As A Dot That Went For A Walk

Monday 11 April 2011

Sunday 3 April 2011
Crazy Hip Hop Rainbow
This is some more motion with a crazy guy dancing and stuff moving behind it. To get the text to move i added a basic motion and to give it the effect i added an image mask on the Bottle video and inserted the text. So now the text has the bottle video playing in it.
Thursday 31 March 2011
Heavy Metal Album Cover
a


This is an album cover for the heavy metal genre. The image is suppose to depict and incorporate an apocalyptic theme.
To produce my album cover I went through a series of stages. First I got an earth texture from the internet then using the elliptical marquee tool I cut out a large circle. I used the spherize filter to make it look 3D. In the layer styles menu I added outer and inner glows to intensify the edges. After that I added in a lens flare for the sun and put some shading on the earth. Then I added text, stars and a rating to make it look professional and it was finished.
The back cover is just some text and a barcode.
Sunday 27 March 2011
Crazy Dancing Green Screen Guys
Sunday 20 March 2011
3D Birthday

Thursday 17 March 2011
Avatar Chick

I'm not all that happy about this one. when i finished i noticed that when i was using the masking tool I didn;t do it smooth enouth and left her hair, eyes and lips a bit wonky. i have to keep practicing that and get a better mouse, mine jumps all over the place.
This was just another tutorial from youtube http://www.youtube.com/watch?v=n65EE_fqB_g
Magic

I really enjoyed doing this one. It was just a tutorial from youtube but i think it looks very effective. The processes involved were very basic. This is the link to the tutorial http://www.youtube.com/watch?v=QcWWoURrqY0
Sunday 13 March 2011

Saturday 12 March 2011
Definition And Inspiration

My definition of rubbish is something that doesn’t work the way you wanted it too. My inspiration came from working with my dad. We were hammering some wood on to a wall and he bent the nail and called them rubbish. With the idea of using nails as my “rubbish” it took me a while to decide how I was going to present them. I hammered them into wood and bent them with pliers to make the shape of letters. When I took the photo I put a grunge layer on it in Photoshop. With the grunge look in mind the target audience would be someone who is into that sort of look. Most likely a teenager who enjoys listening to heavy metal music, but it’s possible an adult would like the photo as well.
Thursday 10 March 2011
Rubbish Font After Photoshop

This is what the photo looks like after I edited it in Photoshop. I used a grunge layer that I got from the internet and set the colour blend mode to “colour burn”. I also duplicated it to make the effect stronger. it ended up being too strong so i turned the opacity down. I think it gave the photo the desired effect I wanted but I’m not happy with the position of the letters and their shape.
Rubbish Font Before Photoshop

This is a photo i took of my font. i used nails and bent them (with great difficulty) into the shapes of letters. it was a lot harder to bend the nails then i thought it would be that’s why they are all different sizes.
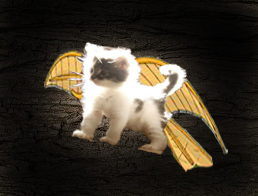
Image Into Image

i tried to do the image into image again because i wasn't happy with the first one. im not very happy with this one either. i think the girl in the top right still looks wrong for some reason and i didn't know how to make it look better.
Sunday 6 March 2011
Granny Climbs The Alps

This was another experiment we did in class today. it was based on the same concept as the first (insert one image onto another) but this time i tried to make it look good. I blurred the background to make the foreground stand out more. The problems with this image is that i couldn't get the edges to look smooth and in the process of trying to make them look better i made the Granny look bald almost. Its a complex process to perfect but i think i'm getting better, so thats a start.
Sweet As Photoshoping (Not Cheesy At All)

The idea of this lesson was to demonstrate out ability using photoshop. As i am new to photo shop and have no real skill with the program this is the photo i produced. it took some time to get used to it because i am not very comfortable using a Mac, but after a while i got the hang of it and was able to produce this picture. I know its not the best photo but it was just to show the knowledge i have with the program so i wasn't fussed when it turned out a bit stupid looking.
Subscribe to:
Posts (Atom)